Step 1. The program
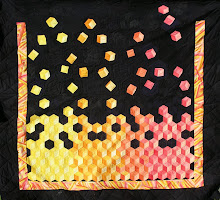
It's just an Excel macro. I think it's pretty neat. It takes the corners and sides of a 3d object, projects it onto a plane, calculates shading, and then breaks it out into a quilt pattern. I've been working on it for a couple of years. The first step is to make the shape, play with different angles and perspectives, and come up with something I want to make!
Step 2. Choosing the fabrics
I usually dye my fabrics - that way I can get the shades I like. I haven't perfected it yet, but it's fun to learn...
Step 3. Printing the pattern onto the fabric
3a. Make the freezer paper backing
 I try to make my patterns from 6.5" x 9" pieces. Hence, I start by cutting about 10-20 rectangles from freezer paper. I try to keep them under some heavy books, as they tend to curl up (which eventually jams the printer).
Note that the freezer paper backing can be re-used numerous times, from project to project. Also, note that I only use a single piece of freezer paper - I tried stacking them up, but that really doesn't work!
3b. Iron the freezer paper onto the fabric
 No steam, etc. etc.
3c.Trim the fabric from the edges of the freezer
 paper
paperHey, I never said it is rocket science.
When I'm not playing with a sheet, I try to keep it underneath a heavy book or between its sheets - keeps everything flatter to prevent jams in the printer!
3d. Print the pattern
 I'll post about the required computer settings later, but for now, set the paper size to 6.5" x 9" and run it through as if it were regular paper. This step took a long time to get "good" at - but I haven't gotten a jam in the last 20 or so sheets I've run through. Keeping the sheet flat is key, along with running them through one at a time.
4. Cut out the pattern
 Pull the fabric off the freezer paper (and store for the next project!) and cut the pieces out.
 I promise to post a pattern for others to test out this weekend!
Note: If you want to know more about how to print onto fabric, check out the Inklingo website and read Linda Franz's book.
Kirsten
Need to ask a question, dumb one at that! lol Are you printing on the fabric or the fp?
ReplyDeleteNother qustion, are you dying using cold water emersion or just what are your techniques? I tried a course in this method and LOVED it. I'm thinking you and I have got to meet! lol Maybe put our heads together and be the next hmmm whoever are the twin greats in the quilting world.
Hey, a girl can dream can't she? lol sylvia
DUH, you print on the fabric! lol I should have reread your post. sigh... it's been a very very long day at work.
ReplyDeleteNo worries - especially since I just realized it didn't work the first time I tried responding!
ReplyDeleteI dye with hot water, but that is because the colours seem more intense - I do like that I can get mottled colours with cold water.
And yes, I will give you a call next time I'm in NY state (as indicated on your blog)
K