Friday 28 August 2009

Inspiring Pictures - Looking up part 1

It will be a crazy day today - I am organizing a "hen party" for a friend. Unfortunately, I am not yet sure what a hen party is supposed to entail. Hence, I am going North American on it and organizing a bridal shower. It should be fun, but I am really stressed about it!

I am happy to realize that I have a lot more pictures of looking up than I have of looking down. Hence, I will split this into a couple of posts.


The first picture is from the Dali Museum in Spain. Everyone must, must, must go to this museum - it is full of his work, work that he liked, and work that was inspired by him. There will be a lot of mention of this museum in the "inspiring pictures" posts.

This glass sphere was in the roof. Now, I have thought a lot about how to break up a sphere into smaller bits. You can see in my first post that I have tried to piece a sphere, but I was never happy with it. This ceiling sphere is cool because it looks like equilatoral triangles, but they sometimes have 5-fold symmetry. I could spend hours trying to figure it out...


Some day, I really want to make a wall-sized semi-sphere quilt, so that it either makes the room larger (if it looks like it is going into the wall) or smaller (if it looks like it is coming out of the wall).


For something a little bit more mundane, this is the ceiling of a ski lodge where I stayed in Switzerland. I could totally make a pattern like that. Someday I totally will.


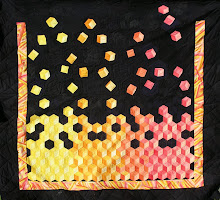
For something more "artsy", I took this picture while sitting under an umbrella in a cafe on a sunny day. It gives an effect something like that Bushfire Sunset quilt from Birmingham. Mom - we could make something like that together - what do you think?


To bleak. This was last March in Seoul, S. Korea. There was a "yellow dust alert". It is fine sand in the air, blown over from China. My father has been in Bejing during a yellow dust storm and he said he couldn't see the other side of Tiananmen Square! I would love to capture in a quilt the repetition of the buildings and architecture and the shades of grey and beige. Obviously, not a quilt about beauty.

Since I live in Cambridge (and have a magic card that gets me into the Colleges), I must mention King's College Chapel. I spend a lot of time sitting in the Chapel, staring at the ceiling while friends and family go through the displays (which I have seen many, many times...) There are only 4 churches in the world with 3-D buttressing like this. It is truly astounding. I would love to make a quilt of this, and convey just how small you are in the face of God (I may not be religious, but there is no way you cannot feel that way when you go into a large church or cathedral).

Ok, off to do the last-minute party preparations! Then, long weekend! Hurray! So much quilting to do...

Kirsten

Tuesday 25 August 2009

Getting into trouble...

Ok, not really. In fact, the exact opposite.

Kevin (or Canadian Attack Beaver as he likes to be called on the internet) is out of town for work, so I am on my own.

It turns out that I really need him to tell me to stop being anti-social and hang out with him in the evenings - otherwise, I get completely absorbed in random things like math and forget to do practical things like eat.

I have been playing with my compass pattern. I am no longer sure if I want to make it for my future niece/nephew - Kevin has suggested that maybe we should meet this new family member before we start making him/her gifts. As it allows procrastination (and I have a new, totally different idea anyway), I am going to bow to Kevin's superior understanding of his own family.

Anyway, I started by adding some flying geese around the edge of the compass. Not that hard to do... and I really like them, especially when they are pulling the compass against the border. I also tripled the layers the border, so that I can have more fun with the colours later.

From there I thought I would try making the geese go outward. This, of course, ended up being outward and inward. The first attempt came out really "flat"... I really didn't like it. And then the endless math came in.

I spent an entire evening trying to fit a sphere to the inner and outer ring. I finally got it working... and it looked pretty much the same as the flat / cone version.

The next day I realized I should be fitting a torus to the ring (I have never, ever claimed to be cool). This way, depending on which part of the torus I align on, I can get the ring flaring inward or outward. It took an entire evening of calculations, but I'm really happy that I got it working!


I'm still not sure which edge I will use - I still like the regular geese as well... and then there is the background colour. I am imagining things in blues and purples right now. I am not sure if it will fade to black, indigo or purple on the outside. First, though, I have to decide how I will get the colours to "swirl". I think I can handle 8 shades before I drive myself crazy, although I was surprised by how much I like the 4-colour variation. I have had fun with trying to draw the eye to various sections of the edge.

Ok, enough fooling around. I really, really have to get ready for work!

Kirsten

Friday 21 August 2009

The Birmingham Quilt Show

I spent yesterday at the Quilt Show in Birmingham. It was a great day out! I don't know if I am allowed to post pictures of the show, but I have scoured their catalogue and website and can't find any advice. Hence, they are here for now...

(From Russia with Love by Christine Russell, in the contemporary quilts category. The catalogue says that it was inspires by the floor in the Summer Palace, St. Petersburg. My in-laws were there a few months ago and I asked for a copy of the picture of that same floor because it was so awesome!)

The Quilts by Hand Yahoo group that I subscribe to recently had a debate about art quilts vs. traditional quilts in shows, so I was especially interested in the comparison in this show.


(New York Beauty by Menal Bridge, in the traditional category)

The definitions of the different quilt categories are
Art Quilts:
"Quilts for walls, where the emphasis includes original design concepts, ideas or emotions balanced by quality of execution and visual impact."
Contemporary Quilts: "For quilts made from ideas derived from the traditions of quilt-making, but given a new approach. Use of original designs and contemporary fabrics, using any technique or combination of techniques, to include quilting (hand, machine or combination)."
Traditional Quilts: "For quilts using a traditional design or pattern. Quilts may be wholecloth, pieced and quilted, appliqué and quilted, or a combination of piecing, qpplique and quilting. Quilting may be hand, machine or a combination."
(from the 2010 application form)

(Bushfire Sunset, by Lisa Walton and Nic Bridges, Group Quilt Category)

The discussion on the Yahoo group (if I may summarize), was that quilt shows seem to have a lot of "art" quilts (especially paintings that have been quilted, or excessive use to bondaweb and then quilted). Many of the art quilts have poor technique, or can barely be called quilts at all. As one person put it, "We don't need the fine art world's rejects".

Birmingham had about 2:2:1 Art:Contemporary:Traditional. The traditional quilts were all very well done. The contemporary quilts were generally pretty good, although there were one or two disappointments (great impact from a distance, but when you look at how they were done, it was all cheating). The art quilts had about 15% real disappointment - quilting threads not even tied off, too much bondaweb, etc.

(Hastings by C. June Barnes, Art Quilts category)

However, I found the contemporary and art quilts more interesting. In the art quilts section I encountered a quilt that I had to turn to the woman standing next to me and ask, "How is that done?"

This lead to a great discussion of the technique amongst several people, and the very high recommendation of "Stitching to Dye in Quilt Art" by Barnes. If a piece can create so much engagement, shouldn't it be in the show?


It turned out that Barnes was sharing a gallery with some others, so I got the chance to see some more of her work. It is fantastic! Completely different from what I do, but I can't wait to try it out! Of course, I did buy the book, and read it on the way back.

All of this feeds back into a long-term discussion I have had with my mother. My mother loves art, and has dabbled in it for years. However, she has never found quilting interesting. As the discussion has gone, Mom is interested in the "overall impression" of a piece, where quilting (and I) are more focussed on fine details and how to build up a pattern.

(Stars in the Universe, by Averil Menzies, Contemporary Quilts category). When I showed my husband pictures last night, this one was his favourite. He went on and on about how cool it is. I said, but the technique isn't very interesting - I have the book (One Block Wonders by Maxine Rosenthal) and it is really easy to achieve this effect. Kevin responded, so what? the composition is really good and the impact is really amazing.

I must admit, on numerous occasions I almost walked by a quilt because the overall impression wasn't very interesting, but then some detail caught my eye and I realized the quilt was much more subtle.

I think that the traditional quilters need the art quilts, because there is so much to learn from them about impression. Similarly, there is so much to learn about core technique from the traditional quilts. There will always be entries that do not meet the standard in terms of technique or impression - however, these will not win!

To conclude, a great day out, and I have left the show with ideas for at least 3 new quilts that I want to start now, now, now! Things that I need to improve:
- Technique. Man, quilting is difficult.
- Colours. There were so many interesting combinations!
- Overall impression to fine detail ratio. I need to chose the balance that works best for me.
- Trying out new & crazy techniques. I can't let myself get into a rut!

Kirsten

Wednesday 19 August 2009

Some Pictures of Inspiration (looking at my feet)

Sylvia asked if I find a lot of inspiration when I travel. Admittedly, most of the travel I do is "fly in - teach a course - find a quilting store - fly out", but there is still time to see some interesting stuff! I have also had the chance to visit a country or two on vacation...

I think I will start with interesting sidewalks. Yes, I do take pictures of the ground if I find it interesting. I also feel sorry for the people who travel with me! But when you think about it, tiles and stones can achieve similar patterns to quilters...

Somewhere in Amsterdam. Cobblestone streets seem to use this pattern a lot (we also have some in Cambridge). It always amazes me that they can make so much curvature, but they are still using blocks! I think we definitely need a quilt pattern based on this.

Same idea, still Amsterdam (I think), larger blocks.


Outside a train station in another small town in Holland. I love how they just used a small squiggle to give such a strong impression of water. Again, we could do that with quilting, couldn't we?


In the gardens of a castle (or ruin of a castle, which is now a city park) in Tavira, Portugal:
I took a picture of this one because it gives the impression of a star, but isn't any of the traditional star shapes. To be honest, the pattern was made of tape and I think it was by some workmen fixing the place up rather than anything mysterious or ancient...

Finally, the ground outside a subway station in Tokyo. I was surprised that I have never seen a Drunkard's Path laid out like this!


Next post I will look up a bit.

Kirsten

Monday 17 August 2009

Success!!

I have now achieved something that most of my family and co-workers already know how to do. Hurray!

I now have the domain name "3dquilt.me.uk", and have added some files to it.

Considering it isn't even 7:30 in the morning yet, please don't say anything about the poor attempt at a homepage for now!

From the post on the weekend, you can download the pdfs of the pattern from:

Light Turquoise
Medium Turquoise
Dark Turquoise
Light Pink
Medium Pink
Dark Pink

The locations of the files may change as I get myself organized, but I will come back and update these links as needed.

Phew. Off to work and more computers.

Kirsten

Ugh.

After trying (and failing) to import some data all day and then trying to figure out DNS codes this evening, I need a break.

A pattern that I am considering for a new niece / nephew that is coming in October:

Subject, of course, to approval by my husband, whose side of the family the baby will be on. I am thinking of this in a 27" block, with some octagons and stars around it (+ 4.5" border) to make 36" x 54".

I have run a quick trial of the pattern, and I may even be able to use up some of my jelly rolls with the star and ring!

Ah. Much more fun than networking.

Kirsten

Sunday 16 August 2009

Uploading a Pattern

has turned out to be more of a challenge than I had hoped. I am currently waiting for my domain name registration to go through so that I can actually post the files. Meanwhile, my flat is about to be overrun by men pretending to be Conan, Clint Eastwood, Sean Connery, etc. (it's Dungeons and Dragons Sunday & they play with funny voices...)

So I am going to write the post now, and add in the links later.

Here is the quilt thus far. I wasn't sure what the block name would be - it was pretty close to "broken dishes", so I decided to go with "shattered dishes". I am going to offset two bulging blocks with opposite colours, and fill the spaces with flat blocks.

The Bulges
If anyone cares, the equation I use for the bulges is z= if(0.99^2-x^2-y^2<0,1,w^(0.99^2-x^2-y^2)), where increasing w increases the bulge. I will eventually post for...

w=0

w=3

w=6

w=9

w=12
w = 9

I have been working on w=9. The total blocks are all 18" x 18", and the sides will always align to a 6" x 6" block (geometry is so cool).

The pattern is broken into 7 pdf files:

Overview, with a map of which piece goes where

A Light, with the light turquoise pieces (4 6.5" x 9" sheets)
A Medium, with the medium turquoise pieces (4 6.5" x 9" sheets)
A Dark, with the dark turquoise pieces (4 6.5" x 9" sheets)

B Light, with the light pink pieces (4 6.5" x 9" sheets)
B Medium, with the medium pink pieces (2.5 6.5" x 9" sheets)
B Dark, with the dark pink pieces (5 6.5" x 9" sheets)

And, if I can get it to upload, the Excel file.

Remember, the piece number is in the corner, and the adjacent piece is along the side. You can print directly onto the fabric, or make templates.

I am going to go hide in the sewing room for a while....

Kirsten

Thursday 13 August 2009

The Method

Unfortunately, I can't find the software for my ftp site. So, no patterns just yet - only a description of how I put my quilts together.

Step 1. The program

It's just an Excel macro. I think it's pretty neat. It takes the corners and sides of a 3d object, projects it onto a plane, calculates shading, and then breaks it out into a quilt pattern. I've been working on it for a couple of years. The first step is to make the shape, play with different angles and perspectives, and come up with something I want to make!


Step 2. Choosing the fabrics

I usually dye my fabrics - that way I can get the shades I like. I haven't perfected it yet, but it's fun to learn...


Step 3. Printing the pattern onto the fabric

3a. Make the freezer paper backing

I try to make my patterns from 6.5" x 9" pieces. Hence, I start by cutting about 10-20 rectangles from freezer paper. I try to keep them under some heavy books, as they tend to curl up (which eventually jams the printer).

Note that the freezer paper backing can be re-used numerous times, from project to project. Also, note that I only use a single piece of freezer paper - I tried stacking them up, but that really doesn't work!


3b. Iron the freezer paper onto the fabric
No steam, etc. etc.


3c.Trim the fabric from the edges of the freezer
paper
Hey, I never said it is rocket science.

When I'm not playing with a sheet, I try to keep it underneath a heavy book or between its sheets - keeps everything flatter to prevent jams in the printer!


3d. Print the pattern
I'll post about the required computer settings later, but for now, set the paper size to 6.5" x 9" and run it through as if it were regular paper. This step took a long time to get "good" at - but I haven't gotten a jam in the last 20 or so sheets I've run through. Keeping the sheet flat is key, along with running them through one at a time.


4. Cut out the pattern
Pull the fabric off the freezer paper (and store for the next project!) and cut the pieces out.


I promise to post a pattern for others to test out this weekend!


Note: If you want to know more about how to print onto fabric, check out the Inklingo website and read Linda Franz's book.


Kirsten

Monday 10 August 2009

Norwich and the Norfolk Coast


We spent the weekend visiting friends in Norwich, which meant lots of inspiration but not much quilting. We did the tourist in Norwich thing on Saturday, complete with shopping and visiting the castle. We also visited an awesome Victorian garden... sometime I wish I had the patience for gardening! (at least with quilting, if I put it aside it doesn't do anything!)

We spent Sunday walking down the beach (my husband, the birthday boy):
More sewing and programming will be forthcoming!

Kirsten

Wednesday 5 August 2009

Patterns: A Rant

The Basic Technique
Before I go on any rants, I should explain how I make my quilts.

I wrote a computer program in Excel to generate the quilt patterns. It takes 3D shapes, rotates them, calculates the shading, and breaks them out into patterns. I should also confess that I have no life and enjoy math a bit more than I should.

I then stiffen fabric with freezer paper, and print the pattern onto the fabric using my inkjet printer. I cut the pieces out, and sew them together using a combination of machine and hand piecing depending on my travel schedule, the difficulty of the pattern, and what kind of mood I'm in.

I always quilt by machine. I can't make a quilter's knot, no matter how hard I try.

Some Notes on Patterns


I spend a lot of time thinking about the best way to generate a pattern (note that I have never claimed to have a life...). This is the system that I have come up with:

the bias: I have read a lot of opinions about how to deal with the bias of the fabric, and the conclusion seems to be "don't". Obviously that doesn't actually work. Hence, I rotate my pieces so that the longest side is along the grain.

cross-hairs: I don't know if I can call my corners cross-hairs. I mark the corners and the mid-point of every side with a line that is perpendicular to its side. That makes it easier to check that the sides line up properly.

sewing lines: I like sewing lines. I think mine are a bit thick as it stands, and I am testing out how thin I can make them before I miss them...

numbering: The piece number is repeated in each corner. The neighbouring piece is indicated on the mid-point line. This system makes it really easy to put everything together. I can't bring myself to use any other system any more.

Admittedly, my algorithm for finding adjacent pieces still has a couple of bugs, so sometimes it doesn't find the neighbours. Work is ongoing.


corners: Obviously, my pieces are irregular sizes. Sometimes I end up with sharp corners. They can be really annoying when adding 1/4" edge, so I cut them off.

wasted fabric: it happens. I am never going to be as efficient as Linda Franz, due to the nature of the shapes I make.

wasted ink: considering all the money I spend on fabric, gadgets, books, etc, I refuse to worry about spending some money on inkjet ink. That said, I get my cartridges refilled, which saves a lot of money.

Soon I will get together a pattern that I am brave enough to share.

Kirsten

Sunday 2 August 2009

10,280 miles later

I am back from an insane trip:
Cambridge
-> Heathrow
-> Houston
-> Atlanta
-> Greenville
-> Atlanta
-> Heathrow
-> Cambridge
in 6 days.


At least I got lots on hand piecing done (the total block will be 18" x 18"). I thought the shading was too pale to get the impression of shadows, but it turned out better than I expected.

I am going to tweak the pattern a bit and then print it out again today (with the inverse colours). If I am happy with that, I will post the pattern.

Kirsten